
Kiosk Mode is one of the most commonly used features for deploying dedicated Android Devices. It allows IT administrators to lock down a Device to a single application or a curated set of Apps, preventing users from accessing anything outside of what the organization has defined — no home screen, no App drawer, no system navigation unless explicitly allowed.
Applivery provides three distinct kiosk modes for Android, each designed for different use cases and levels of customization.
Kiosk mode is only available on Fully Managed Devices. See Android management options for more information on enrollment types.
Available Kiosk Modes
Mode | Apps allowed | Description |
|---|---|---|
Single App | One App | Locks the Device entirely to a single application. The most restrictive mode. |
Basic Launcher | Multiple Apps | Multi-app kiosk using Android's native Device Policy Controller. |
Advanced Launcher | Multiple Apps | Applivery's custom launcher with two operating modes: Launcher (managed launcher without kiosk restrictions) and Kiosk (full multi-app lockdown with extended configuration options). |
Single App kiosk mode
Single App kiosk mode locks the Device to one specific application. Users cannot exit the App, access the home screen, or reach any other part of the Device unless the administrator explicitly allows it. This is the go-to mode for point-of-sale terminals, self-service kiosks, digital signage, data collection Devices, and any other single-purpose deployment.
Single App kiosk mode is configured at the Policy level in Applivery.
Go to any of your Policies 1 or create a new one. From the left-hand menu, click Kiosk, and select the Single App 2 option.
Choose the App to lock the Device from the dropdown 3. If no Apps are listed, go to the Apps section of the Policy and add at least one Force-Installed App first.
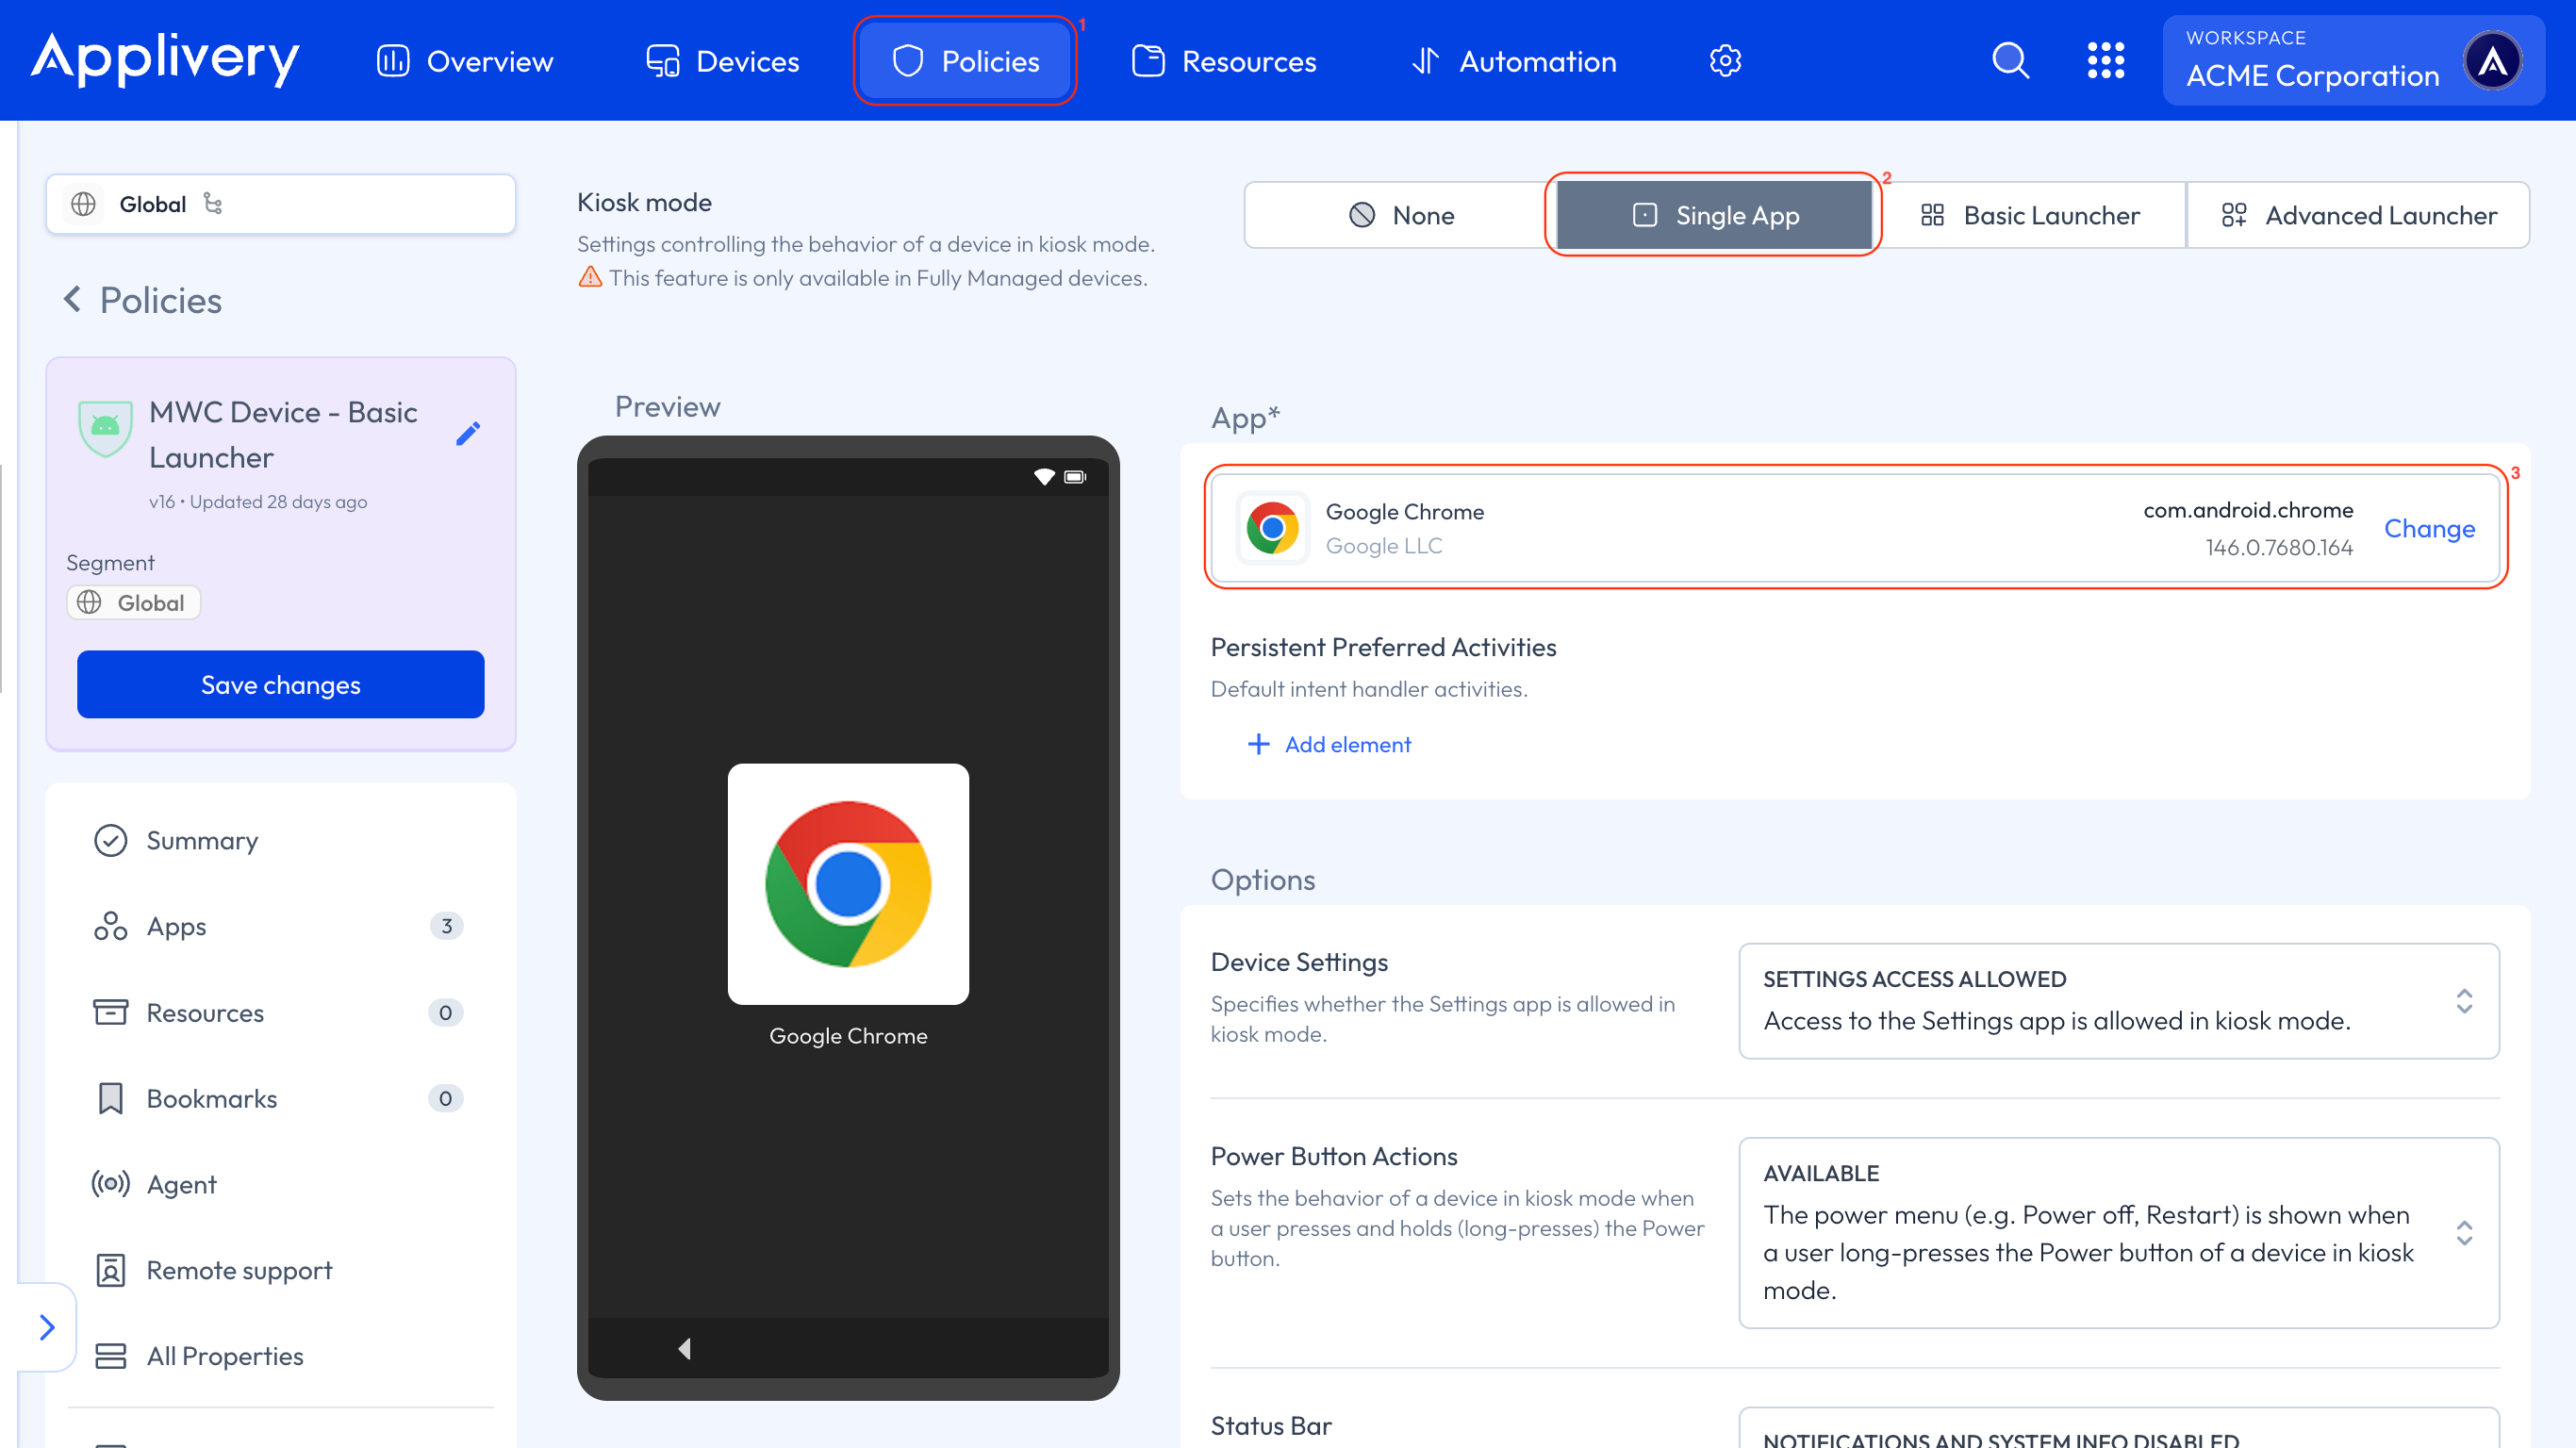
Configure the lockdown behavior options (described below).
Option | Description |
|---|---|
Device Settings | Whether the Settings App is accessible while in kiosk mode. |
Power button actions | Controls the behavior when the user long-presses the Power button. |
Status bar | Specifies whether system info and notifications are disabled in kiosk mode. |
System error warnings | Whether system error dialogs for crashed or unresponsive Apps are blocked. When blocked, the system force-stops the App as if the user selected "Close app". |
System navigation | Specifies which navigation features are enabled (e.g., Home button, Overview/Recents button). |
Network escape hatch | If enabled, and a network connection cannot be established at boot, the user is prompted to temporarily connect to a network to refresh the Device Policy. The temporary connection is forgotten once the Policy is refreshed. |
We strongly recommend enabling the Network Escape Hatch in all kiosk modes. Without it, a Device that fails to connect to the network at boot — for example, because the last known network is no longer available — may become stuck and unable to receive Policy updates, especially when booting directly into a locked App.
Declaring android.intent.category.HOME in your App's main activity intent filter may prevent certain kiosk settings — such as system navigation restrictions or status bar control — from being applied correctly on some Devices. Test thoroughly on your target hardware before deploying.
Basic Launcher (Multi-App kiosk mode)
The Basic Launcher allows administrators to define a list of allowed applications displayed in a locked home screen UI. It is built on Android's native Device Policy Controller (DPC) and provides a solid foundation for multi-app kiosk deployments without requiring additional licensing.
Inside the Policy, go to the Apps section. Click + Add App and add each application you want to make available in the kiosk launcher.
Key rules for App visibility in the Basic Launcher:
Only Apps set to Force Installed will appear in the launcher interface.
All System Apps are hidden by default — if you need a System App visible (e.g., Phone, Camera, Chrome), you must add it explicitly.
From the left-hand menu, click Kiosk and select the Basic Launcher 4 option. Configure the lockdown behavior options (same options as Single App mode — see the table above).

Advanced Launcher (Multi-App kiosk mode)
The Advanced Launcher is Applivery's custom-built launcher for Android policies on Fully Managed devices. Unlike the Basic Launcher, it introduces two distinct operating modes — Launcher and Kiosk — that serve different deployment scenarios with different levels of restriction.
To enable it, go to the Kiosk section and switch to the Advanced Launcher 5 tab.

Operating modes
Launcher replaces Android's default launcher with Applivery's managed launcher, but does not activate a restricted kiosk mode. The device continues to function as a normal Android terminal in terms of general experience — but through Applivery's launcher layer, which enables advanced policy-driven configurations that Android's stock launcher does not support (for example, enforcing a corporate wallpaper). This mode is the right choice when you want a managed launcher experience and additional controls without locking the device to a defined set of apps.
Kiosk activates a full multi-app kiosk: a locked screen with one or more applications available to the user, without an open launcher experience. This is the appropriate mode for dedicated devices where the device must remain restricted to a specific set of apps. In addition to the Launcher mode capabilities, Kiosk mode adds centralized control over screen navigation, power button behavior, status bar, system errors, and network recovery — the controls typical of a traditional kiosk configuration.
General configuration
The settings in this section apply to both Launcher and Kiosk modes.
App operation mode
Select the operating mode — Launcher or Kiosk — from the App operation mode 6 selector. This is the most important setting in the Advanced Launcher configuration: it determines whether the device runs a managed launcher without kiosk restrictions, or enters a full kiosk scenario.
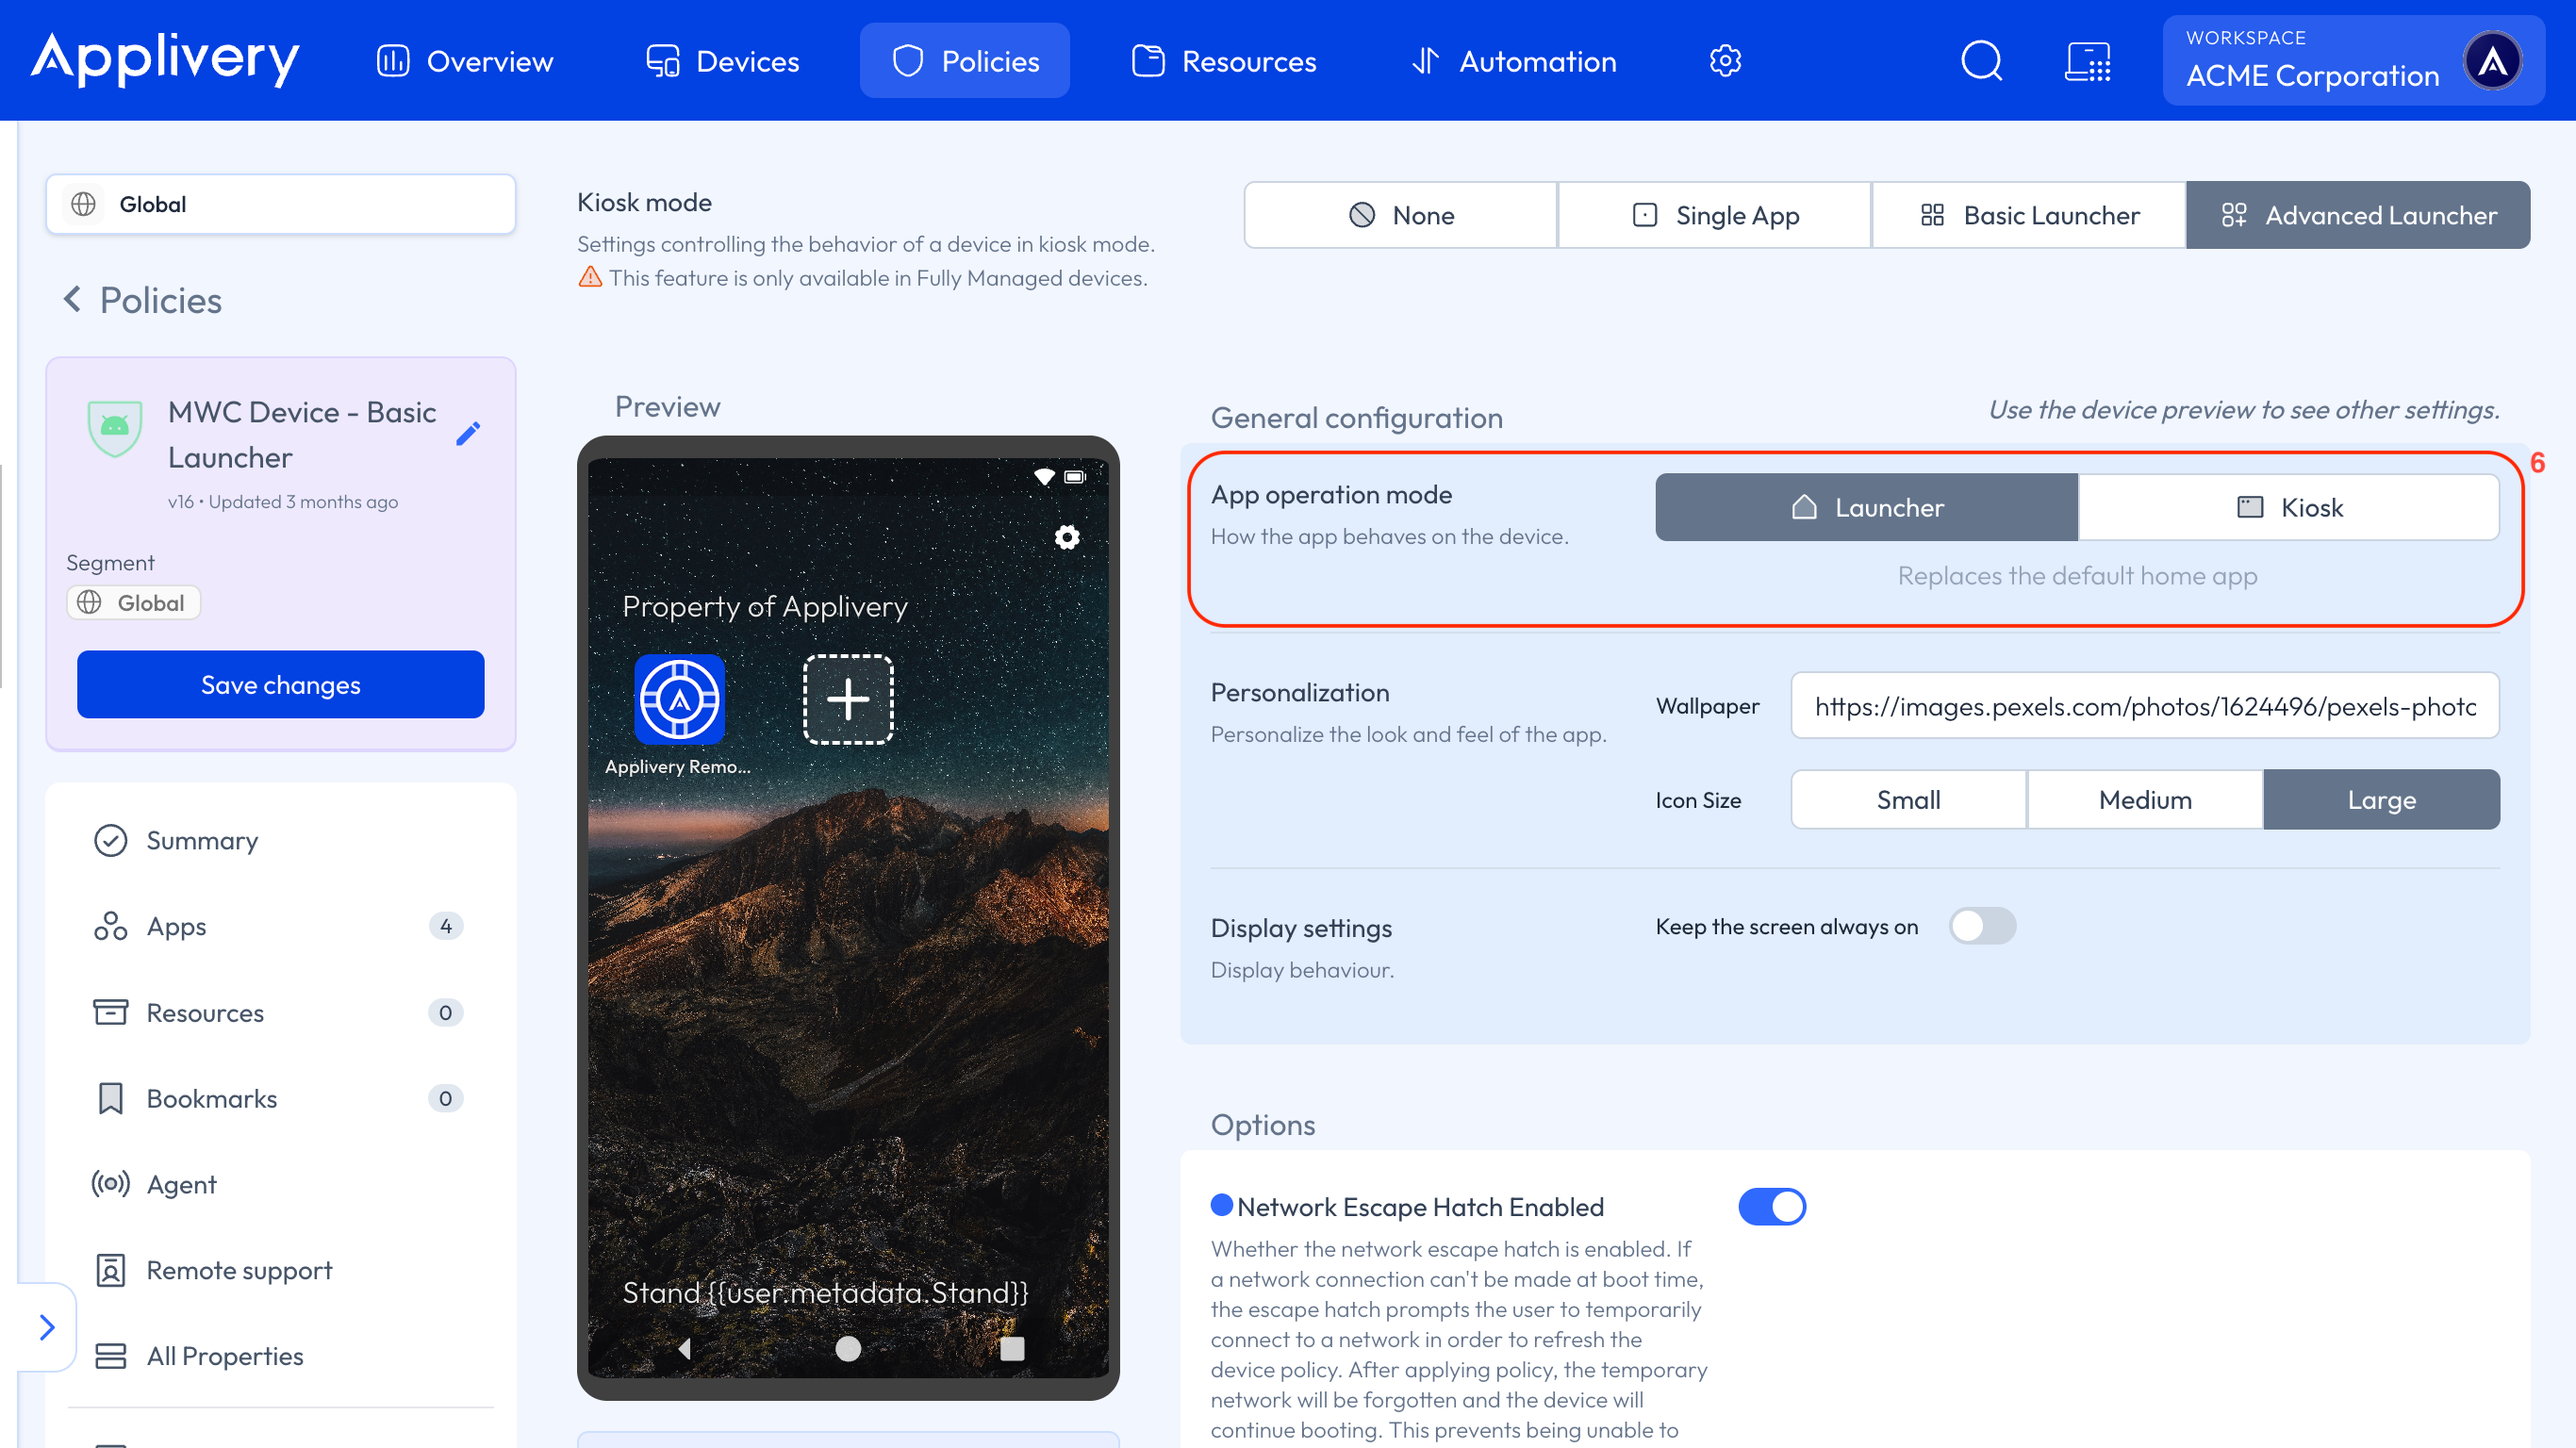
Personalization
Customize the visual appearance of the managed launcher:
Wallpaper: URL of the background image. Must point to a web-accessible host where the image is stored.
Icon Size: Small, Medium, or Large.
App layout: Organize the arrangement of apps on the screen.
Folders: Group apps into folders for a cleaner layout.
Both fields support dynamic variables — for example, to display the device serial number or the email address of the assigned user.
Startup app: By tapping on a specific app in the Advanced Launcher configuration, you can mark it as the startup app. This causes the app to launch automatically the first time it is installed on the device — particularly useful for applications that require an initial setup or onboarding flow to run before anything else.
Display settings
- Keep the screen always on: Keeps the screen permanently active, preventing it from going to sleep.
Settings access control
The Advanced Launcher gives granular control over how — or whether — users can access the device Settings:
Restrict access entirely: Prevent the Settings app from opening.
Configure the landing view: Choose which Settings screen opens when the user taps Settings, rather than showing the full Settings menu.
Password-protect Settings: Require a password to access the Settings app, ensuring that only authorized users (such as technicians or store managers) can make system-level changes on the device.
Options
Kiosk mode — exclusive settings
The following settings are only available when Kiosk mode is selected.
Setting | Description |
|---|---|
Device Settings | Whether the Settings app is accessible (allowed) or blocked for the user. |
Power Button Actions | Controls the long-press behavior of the power button. Available keeps the power menu accessible; Blocked prevents the user from powering off or restarting the device using the power buttons. |
Status Bar | Whether the status bar, notifications, and system info are visible. Options: all enabled, all disabled, or system info only. |
System Error Warnings | When muted, system error dialogs (crashes or "app not responding" messages) are suppressed and the app is force-closed automatically — preventing pop-ups that break the kiosk experience. |
System Navigation | Whether Home and Overview buttons are accessible. Navigation Enabled allows the user to navigate freely; Navigation Disabled removes access entirely; Home Button Only restricts to the Home button only. |
Common settings — Launcher and Kiosk
Network Escape Hatch: If the device cannot establish a network connection at boot, the user is offered a temporary network recovery path to refresh the policy. Once the policy is applied, the temporary network is forgotten and the boot process continues normally.
We strongly recommend enabling the Network Escape Hatch in all Advanced Launcher policies. Without it, a device that fails to connect at boot may become stuck and unable to receive policy updates. Note that this option may be overridden by Wi-Fi restrictions such as Wifi Config Disabled or Configure Wifi = DISALLOW_CONFIGURING_WIFI.
Advanced display settings
In addition to the general display setting above, the Advanced Launcher exposes more detailed controls over brightness, timeout, and power behavior. These settings allow fine-tuning the operational behavior of the device in both modes.
Setting | Description |
|---|---|
Screen Brightness | Brightness mode: User choice, Automatic, or Fixed. |
Screen Timeout | Whether the timeout duration is left to the user (User choice) or enforced by the policy. |
Maximum Time to Lock | Maximum inactivity period before the device locks, with a configurable value and unit. |
Stay On Plugged Modes | Which power sources keep the screen active: AC Charger, USB Port, and/or Wireless. Useful for fixed kiosks or always-on terminals. |
The launcher interface also supports a customizable Header and Footer, configurable by tapping the corresponding area in the preview:
Header: Text displayed at the top of the launcher or kiosk interface.
Footer: Text displayed at the bottom of the launcher or kiosk interface.
Both support dynamic variables — for example, device name or user email — which is particularly useful for shared devices deployed across multiple locations.
Choosing the right kiosk mode
Deployment scenario | Recommended mode |
|---|---|
Point-of-sale terminal with a single POS app | Single App |
Self-service kiosk or information panel | Single App |
Data collection device (one field app) | Single App |
Shared device with multiple approved work Apps | Basic Launcher |
Managed device needing a corporate launcher with policy controls, without full kiosk lockdown | Advanced Launcher — Launcher mode |
Retail device with branded experience and corporate tools | Advanced Launcher — Kiosk mode |
Digital signage with a screen-always-on requirement | Advanced Launcher — Kiosk mode |
Shared device requiring per-location identification | Advanced Launcher — Kiosk mode (with header/footer dynamic variables) |
Kiosk requiring technician-only Settings access | Advanced Launcher — Kiosk mode (with password-protected Settings) |
AOSP Devices Support
On AOSP Devices, kiosk mode is supported through Single App kiosk only. The Basic Launcher and Advanced Launcher modes are not available on AOSP — they depend on AMAPI and Managed Google Play infrastructure that AOSP Devices do not have.
To set up Single App kiosk on an AOSP Device, add the target App to the Policy with Install Type = Kiosk (only one App per Policy can have this install type), then open the Kiosk section and configure:
Setting | Description |
|---|---|
Power button | Allow, disable, or single-press to turn off screen. |
System error warnings | Show or hide system error dialogs. |
System navigation |
|
Status bar | Show or hide the status bar. |
Device settings | Allow or block access to Settings. |
Network escape hatch | Prompt the user to temporarily connect to a network if the Device cannot reach the Applivery backend at boot. |
Enable the Network Escape Hatch on every AOSP kiosk Policy. Without it, a Device that fails to connect at boot may become unreachable and require a factory reset to recover.